顯示具有 drive 標籤的文章。 顯示所有文章

2015年12月30日 星期三

電腦問題(0027) - 如何把 Google 雲端硬碟 (Google Drive) 的照片或圖片公佈到部落格

問題 (PROBLEM)

如何將存在 Google Drive 的照片公布在部落格上?

解決方法 (SOLUTION)

目前筆者知道的有兩個方法:

方法一:

這個方法是比較不麻煩的,就是在自己的電腦上下載 Google 雲端硬碟,安裝在電腦上。當要加入存在雲端硬碟的圖片或照片時,就直接選擇 "upload" ,這樣就可以把電腦上雲端硬碟的那個 "備份" 給上載到部落格了。這樣相當於把 Google 雲端硬碟的那個照片多了兩個分身,一個在自己電腦上,一個在部落格。

不過,最近好像更進步,只到自己的電腦上有圖片,直接把圖片從視窗裡 "拉" 到部落格的編輯區就可以幫你 "複製" 好了。


方法二:

這個方法是讓部落格或您的網頁 "間接" 連結到 Google 雲端硬碟的那個相片。為什麼說 "間接" 呢?當然就是因為筆者不知道如何 "直接" 嘛!(如果您知道,歡迎留言。在此先感謝您好心的分享囉!)

所謂 "間接" 就是利用 gdURL.com 的免費服務,把雲端硬碟的相片放到部落格或網頁上。
(如果是要放在部落格上,筆者還是建議用第一個方法,快而且多留些備份也是好的。)

步驟:


1. 首先需要到 Google Drive 裡預覽該照片。並按下以下紅色圈起來的 "分享" 按鈕。


2. 在出現的視窗的右下角按下 "進階"。


3. 在接下來出現的視窗按下 "變更"


4. 確定點選 "開啟 - 公開在網路上",然後再點選 "儲存"(如下圖) 


5. 然後會回到下面的視窗,你會看到 "公開在網路上 - 網際網路上的所以人皆可尋找即檢視",請按下 "完成"。


6. 再按一次分享:

7. 把 "https://drive.google.com/.........sharing" 整行 Copy 下來,按下 "完成"。


8. 到 gdURL.com,然後把剛剛 copy 那段 URL 貼到下圖的上方紅色框的那個位置:


然後按下上圖中間紅圈的那個 "Create Permalink" 按鈕。

因為這是免費的,當然他們鼓勵大家慷慨地贊助捐款,不然怕維持不下去。所以您如果有餘力,也可以考慮按下下方的 "Donate" 捐個款,讓這個服務能繼續免費下去。

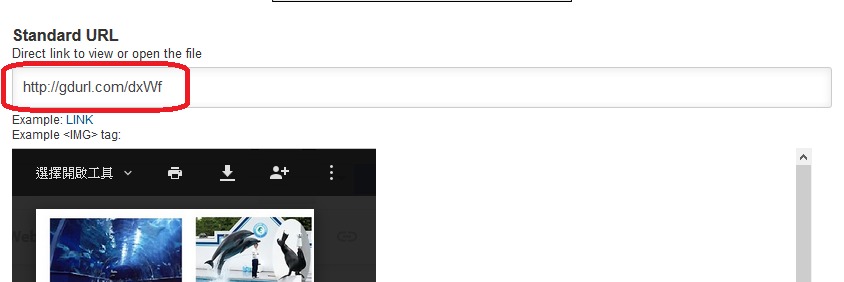
9. 接下來,把 gdURL.com 產生的 URL,copy 下來。


10. 在部落格上想加入相片的位置,先從您的電腦上隨便 "抓" 過來或者 "上載" 一張圖片到部落格 (否則,您就需要自己用 html 的方式加入一個 的 tag)
圖/照片抓過來後,請到 HTML 編輯區:


11. 找出剛剛加入圖片/相片的位置,如下圖中反藍的部分改成剛剛從 gdURL.com 那邊 copy 來的 URL。然後存好公布就可以了。


聲明:

此方法在筆者的電腦上有解決上述問題,但並不保證能解決您電腦上的問題。如果無法解決您的問題,或產生其他問題,請原諒筆者無法負責。

Please note: The methods worked on my computer/system do not guarantee to work on your computer/system as well. So if you want to try my methods, please do it at your own risk. Thanks.


電腦問題(0026) - 如何手動同步 Google 雲端硬碟

問題 (PROBLEM)

已經從電腦上傳到 Googe 雲端硬碟的檔案,如果在本機上做過修改之後,如何手動同步網路上的雲端硬碟?

How to manually sync Google Drive?

解決方法 (SOLUTION)

基本上筆者並沒有找到有任何選項可以手動同步。網路上也有很多人說有問過 Google 但是沒有回應或沒有這個選項。

以下介紹三種 "手動的" 方法,可以 "比較快地" 讓雲端硬碟 "自動" 更新檔案。

Although a lot of people asked about this question on the internet, I have not found any official solution (for the user to MANUALLY synchronize between the files on Google Drive and on the Google Drive folder/directory on your PC).

The following three (manual) methods should be able to force (sort of) the Google Drive to update/sync automatically sooner.

方法一 (Method 1):

如果只有少數幾個檔,可以直接先把該檔案從你的電腦上的 "Google 雲端硬碟" 移到自己的電腦上的其他資料夾編輯,等編輯結束再把那些檔案搬回去雲端硬碟。Google 雲端硬碟對於 "移除檔案" 與 "新增檔案" 的更新通常是比較優先的。

When not many files need updated, you may just move the files out of the Google Drive folder on your PC to your local folder/directory on the PC to edit. After finished, move the files back to the Google Drive folder/directory on your PC. The Google Drive will sync very soon.

方法二 (Method 2):

如果檔案沒有太多,可以在電腦上的 "Google 雲端硬碟" 資料夾編輯完檔案後,把編輯過的檔案的檔名稍作修改 (例如在檔名的最後加上個 "-01" 之類的),然後再改回原來的就可以了。檔案名稱的改變也會使雲端硬碟盡快更新。

Again, if not many files need updated, after you finished editing the file on the Google Drive folder on your PC, you may rename the file (such as adding "-01" at the end of the file name). And then change the name back to the original one. Google Drive should update/sync soon.

方法三 (Method 3):

這個方法適用於當要更新的檔案較多。而且這也應該是比較正確的方法。不過沒有先說這個方法是因為有時候好像也沒有很快就同步的樣子。

If the files need updated are a lot, this is the way you want to use. (although according to my experience, it may not be very soon sometimes)

方法如下:

Please follow these steps:

1. 請到 Windows 工作列的右方 (銀幕的右下方) 有一個雲端硬碟的標示 (如下)。

At the right-bottom corner, you may find the following icon at the task bar:


在這個標示按下滑鼠右鍵/左鍵 (都可以),會出現同步處裡的訊息視窗。

Please click on the Google Drive icon with either the left or right mouse button.

2. 在這個訊息視窗的右上角有三個點的標示,請用滑鼠左鍵點下,就會看到下方的選項。

Then on the popped up window you will find an icon with three dots. Please click on the three-dot icon.


3. 請選擇 "暫停",過個一、兩秒之後再按 "恢復"。這樣並不會 "馬上" 同步,不過過個幾秒後應該就會同步了。

Please choose "Pause", and then choose "Resume" after about 2 seconds. After several seconds or one minute, the files should be updated/synchronized.


聲明:

此方法在筆者的電腦上有解決上述問題,但並不保證能解決您電腦上的問題。如果無法解決您的問題,或產生其他問題,請原諒筆者無法負責。

Please note: The methods worked on my computer/system do not guarantee to work on your computer/system as well. So if you want to try my methods, please do it at your own risk. Thanks.